Don’t Buy…DIY!

I’ll be honest- I’ve just started to cook again these last several days, after a horrible phase of treatment and a trip to the hospital.  Methotrexate is my biggest rival, and if you don’t know what it is, I hope you never have to. Hint #1 that it will make you feel like curling up and hibernating: the IV infusion looks like lemon-lime Gatorade is about to run through your veins. Funny, because I often count on Gatorade to make me feel better.

HOWEVER, I did make two snacks that I would normally buy from the store: popsicles and crackers. That about evens it out, right? They are so easy to make, and doing it yourself means that you only have yourself to blame when they aren’t sweet/savory/creamy/crunchy enough!

Also, popsicles and crackers happen to be the world’s top go-to foods when someone’s sick.*

*Not a fact, but probably.

My birthday was on the 4th, and my wonderful boyfriend bought me a Zoku popsicle maker. I’ve been crazy about popsicles my whole life and have fond memories of sharing one with my childhood dog on super hot days (like you never did the same thing…)  After a few discouraging tries- you really have to blend the ingredients and store the pop maker in the back of your freezer– I made a delicious frozen treat from fresh, local ingredients, and with a secret helping of protein!  The best part is, you can just use whatever’s lying around.

With just a few ingredients...

With just a few ingredients…

I made a wonderful peach, basil, and goat cheese popsicle!

I made a wonderful peach, basil, and goat cheese popsicle!  Adding a bit of almond milk keeps it creamy.

This has been a saving grace because most store-bought popsicles have too much citric acid in it, and they irritate an already sensitive GI tract.  If you like a bit of decadence, try blending some cocoa, milk, peanut butter, a dash of salt, and your favorite sweetener.  It makes for a nice fudge pop!

Since I had chemo on my birthday, we stayed in that night and made pizzas.  Super fancy delicious pizzas because I was feeling well enough to eat something flavorful. We topped them with goat cheese, sun-dried tomatoes, ramp leaves (had some in the freezer), mushrooms, garlic, onion, prosciutto, and truffle oil!  I ate the leftovers for breakfast.

But we still had a small ball of dough left, so I decided to make some homemade crackers!  All you have to do is roll the dough out SUPER thin and bake it at 400º until golden brown and crispy.  Keep watching them, though- those suckers can go from perfection to overdone in seconds.

Rustic.

Rustic beauties.

As I wasn’t too keen on protein this week, I hid some extra grams in the crackers, too.  I shredded about an ounce of cheese and folded it into the dough with some sage and thyme.  Before putting it in the oven, I sprinkled some sea salt and fresh ground pepper over the sheet.  I did cut lines in the dough, so that they’d easily break into squares.  However, the outside cooked much faster.  Next time, I will separate the squares for more even baking.

If you’re not into cheese, try adding nutritional yeast instead.  It will give you that same nutty flavor and a nice helping of protein.  In a few months, it will be pumpkin season- adding a few spoonfuls of canned pumpkin, a bit of brown sugar, and your favorite winter spices, will turn this snack into a sweet treat.

So there you have it:

  • No more spending tons of money on these easy-to-make snacks.
  • You can finally eat popsicles without irritating your stomach.
  • Don’t want to eat tons of protein?  That’s OK- you can get protein, anyway!

Well, I shall leave you with a bit of bragging: I’m not neutropenic right now!  I have been going crazy over fresh produce.  Here’s what I had for lunch today:

IMG_0241

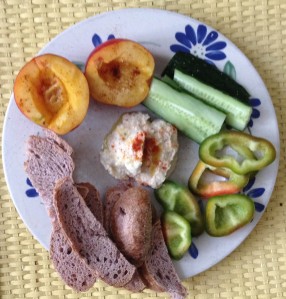
Zucchini baba ghannouj with little toasts, fresh veggies, and a nectarine sprinkled with chili powder for dessert.  The baba ghannouj can be made neutropenic-friendly quite easily.  Stay tuned for the recipe!


I’m 24 Years Old, and I Have Hot Flashes.

My body tends to overheat.  Even in the Winter, I often keep a fan on while I sleep.  I daydream about being back in Western New York, where things are much cooler than they are here.  On top of this predisposition, my chemo gives me hot flashes.  In short, I am constantly trying to cool down.

I’ve noticed that the most effective methods are those that bring my internal temperature down.  One method is pretty kooky: I actually will close my eyes and pretend I’m skiing in the Alps or on an expedition to Mt. Everest’s highest peak.  This seriously works.  When it’s freezing out, I think about lying on a hot Mediterranean beach.  I think maybe it just calms me down.

The other is eating frozen stuff.  All the time.  Iced is not good enough for me.  So I thought I’d share some of the things I freeze:

  • Fruit puree and bananas: I explained the purees in my first blog post.  By freezing everything that would go in a smoothie, and adding a ton of ice, I get all the taste while going on a short vacation to Antarctica, too.  Also, using less ice yields a thicker, creamier treat, much like sorbet.
  • Lemon water: After juicing and zesting lemons for lemonade/future cooking, I boil the leftover scraps for about 10 minutes.  It doesn’t get bitter, and it adds a soft tang to the water.  Just freeze in your ice tray, and either pop them in the blender with some sweetener, or add them to a glass of water.
  • Coffee and tea: Who doesn’t like a Dunkin’ Donuts Coffee Coolatta?  They’re so creamy and refreshing!  But also full of fat, served in throwaway plastic cups, and in a public place you probably have to drive to.  The trick to making one at home is not to add ice to cold coffee, but to freeze coffee in an ice tray and blend it up with a banana (not frozen) and some milk.  Just make sure to chop up the ice in the blender first.  I only drink tea these days, so I use that instead.  Yesterday, I brewed 2 cups using 2 heaping spoonfuls of Earl Grey and 1 of dried lavender.  This morning, I blended it with a banana and some almond milk.  A perfect way to wake up.

Other ideas: hot chocolate, nut butter and banana puree, vegetable juice, infused simple syrups…

Let me know what you do when you get hot flashes!

Also, I wonder if this could be a good way to store a large batch of compost tea?

One more thing: I am just now discovering the world of PICC line couture.  I was so tired of that itchy gauze that was NOT helping my skin rashes from the dressings.  So I started wrapping my extensions in my Lululemon wristband keyholder.  Then I found an old hair band and decided, hey, that would be a nice cover!  I’m going to start making some new ones from fabric ends and elastic.  They let the site breathe so much more, and I can move it down my arm to give my skin a break.  If you’re on Pinterest, search ‘PICC line covers’, and you’ll see all sorts of creative stuff!

photo1 (7)

A nice little bow over my dressing 😀

Ramps, ramps, everywhere!

Here’s the deal.  A lot of my ideas were thought up long before I decided to start a blog.  Which means there’s often no photographic evidence and almost no exact measurements.  So, I propose you use your imagination on a lot of this.  Like reading a book! (I’ll get better, I promise.)

Now that we’ve got that settled, let’s talk ramps.  Some call them wild leeks or wild onions.  They’re one of the most tender of the onion family, and they’re one of the first signs of Spring.  Like all early Spring veggies, they taste light and fresh, but they also pack a nice funky punch.  Because of their garlicky odor and oniony/garlicky taste, they can be swapped into many dishes for a lighter refreshing quality.  The bulbs are also juicy and so yummy raw.  But we can’t eat them raw, can we?  So we gotta get down ‘n’ dirty in the kitchen and find some ways to enjoy them thoroughly cooked.

First, can I just say that I LOVE washing ramps?  They get really dirty and there’s a slimy film around the bottom that you just sort of pinch off.  And the bulbs are so smooth, the dirt just slides right off.  And the roots snap off so easily and so, so cleanly. In short, cooking with ramps is a twofer: you get a delicious meal AND free therapy.

Our fridge has had an overload of ramps this season, both with the leaves and without.  Here, I’m highlighting just three of the dishes I’ve made so far: ramp pizza, ramp and pea soup, and Greek pasta salad with roasted ramp bulbs.  I only took pictures of the pasta salad.  (Let me remind you of the first paragraph I wrote.)

LOOK AT THESE BEAUTIES!!!

Source: wildwestvirginiaramps.com


Ramp Pizza:

I don’t have a real recipe for this, but I’ll just give you an idea of how I used them (fail), then suggest how you should actually use them (win).

First, I separated the greens and bulbs.  Then I sliced up the bulbs and sauteed them with mushrooms, onion, and garlic. (I’m a huge fan of alliums.)  I opted for a white pizza and added the sauteed veggies on top. **Always saute water-heavy veggies before putting them on a pizza crust, or you’re gonna have some soggy crust!

The green tops are more difficult.  For the first pizza, I left them whole and laid them from the center out for the last 5-7 minutes in the oven.  They were chewy, and the whole piece would come off with the first bite.  The second time, I tore them into small pieces and sauteed them with the rest of the veggies, adding them to the pizza in the beginning.  They were easier to eat, but they still remained somewhat chewy.  If that bothers you, you could leave them off…OR: make ramp pesto!

I’ve heard that ramp pesto is fabulous, and you could really throw in whole ramps, which is so much easier.  I’d suggest putting them in your food processor with some pine nuts, some olive oil, maybe some more herbs, and using it as the base sauce.

Source: lainesrecipebox.blogspot.com

Someone please get me more ramps so I can do this right!


Now that you’ve learned from my mistakes, let me wow you with the brightest, zippiest, snappiest soup ever to grace my kitchen.  Did I mention it’s super easy and is remarkably refreshing when served cold?  Here’s what you’ll need:

  • 2 cups frozen or fresh peas
  • 16 or so ramps (leaves and bulbs)
  • 1 yellow onion, coarsely chopped
  • 3-5 garlic cloves, minced or pressed
  • 3 cups chicken broth
  • 1 tbsp. butter
  • 2 tbsp. dried basil (Note: A strict neutropenic diet calls for all herbs to be cooked.  I don’t even bother getting fresh basil, especially since that hydroponic crap that’s suddenly EVERYWHERE tastes like nothing.  And smells like urine.)
  • Whatever grating cheese you have on-hand.
  • Salt and pepper
  1. Separate ramp bulbs and greens.  Chop up the bulbs and add them to your pile of chopped goodies (onions and garlic).  Chop or tear up the greens and set them aside.
  2. Grind the basil in a mortar and pestle.  Grind it REEL GOOD.
  3. Set your stock pot on medium-hight heat.  Sautee the bulbs, onions, and garlic in butter for 5-7 minutes.  You want them a little brown.
  4. Add the chicken broth, peas, and greens.  Bring to a boil, then lower the heat, cover, and let simmer 10-15 minutes.  Stir occasionally.
  5. Blend in food processor or immersion blender until thick, but still textured.  If you don’t trust your appliances, wrap a towel around the food processor so you don’t get flyaway hot soup in your face.  You also might have to do this in more than one batch, depending on the size of your food processor.
  6. Pour soup back into pot and keep over heat for another 10-15 minutes, adding grating cheese to your liking.  I used maybe an ounce or two.  Add salt and pepper, as desired.
  7. Serve hot with some chewy sourdough, or try it cold with a dollop of lowfat greek yogurt and some stoned wheat thins.


Aaaand last, but not least: Greek pasta salad with roasted ramp bulbs!

photo3 (2)

+

photo4 (1)

=

photo2 (4)

!!!

You will need:

  • 1 can chickpeas, drained and rinsed
  • 2 1/2 tbsp. olive oil
  • 1 tsp garlic powder
  • 10-12 ramp bulbs, halved or quartered lengthwise
  • Spinach or kale, julienned or just torn into small pieces (I used a combination)
  • 3-4 garlic cloves, skins on
  • 1 tbsp. oregano
  • 1 tsp. lemon zest
  • 1/4 lemon
  • 6-8 kalamata olives, roughly chopped
  • 3 cups uncooked short-cut pasta (I used fusilli)
  • 2 oz. feta cheese
  • Salt and pepper
  1. Preheat oven to 400.
  2. Cook pasta as directed on packaging.  Throw greens in a medium mesh strainer.  During the last 5 minutes of cooking pasta, rest the strainer in the pot above the water to steam.  Drain pasta, transfer to a large glass or ceramic bowl, put in fridge.
  3. In a medium bowl, toss chickpeas with 1 tbsp. olive oil, 1 tsp. garlic powder, a few dashes each of salt and pepper.  Lay out on baking sheet, making sure the chickpeas have some room between them.  Throw in oven for 15-20 minutes.
  4. Toss ramps with olive oil and lay out on aluminum foil.  Wrap garlic cloves in foil.
  5. Flip the chickpeas as best as you can.  Just tossing them a little on the baking sheet helps.  Add ramps and garlic to sheet.  Stick back in the oven for another 20 minutes, or until chickpeas are a dark tan color and crunchy.  Ramps should be browned on top, and if you cut into the garlic, it should be spreadable.  I suggest transferring the baking sheet to the top rung for the last 20 minutes.
  6. In a small bowl, mix 1 1/2 tbsp. olive oil, 1 tbsp. oregano, and 1 tsp. lemon zest.  Heat in microwave or on stove, just so the oregano and lemon is safe to eat.  Add juice from 1/4 lemon, olives, and roasted garlic.  The garlic won’t blend well, but it should break into small pieces.  You can always chop it before adding it.
  7. Throw the dressing, ramps, and feta into the pasta salad.  Salt and pepper it to your liking.  Refrigerate until ready to eat.
  8. After plating pasta, add 1/4 cup roasted chickpeas.  Happy eating!

I wasn’t thinking and added salt to the pasta and spinach before dressing it. This recipe has kalamata olives and feta in it; what was I thinking?  Nobody wants to eat a salt lick for dinner, so add the basics after you taste the finished product.

Just one thing to note: I’ve read that if you forage for ramps, you should just take the leaves.  The bulb can then produce more, and you haven’t ruined the supply.  I get it, I guess, but the bulb is my favorite part.  So just stick by the 1/3 rule.  I’m pretty sure the fleeting ramp season is finished in Southeastern Pennsylvania, but in Northern climates, you may just find a nice patch near your house.  You can also grow your own or maybe find them at the farmers’ market. If you’re neutropenic, just be sure to wear gloves and a mask when you’re foraging or going to the market; you don’t want to end up back in the hospital!


A Freezer Full of Berries

My parents visited from NY this past weekend, just in time to take me home from the hospital. Due to a neutropenic fever and low blood counts, I was there for about two weeks.  For those of you who haven’t experienced neutropenia, these fevers happen when someone with a low neutrophil count gets an infection.  I’ve been in the hospital 5 or 6 times since the 5-week initial stay, and all but one was because of a fever.  They’re very annoying and usually come at night, when the E.R. is most crowded.

My parents go grocery shopping for me when they ‘re in town.  They fill our freezer with frozen meals, popsicles, and frozen fruits and veggies that I can easily heat up when chemo gets the best of me.  This time, I forgot to remind them that frozen berries are a no-no (stone fruits like peaches and mangoes are fine) and consequently ended up with 3 or 4 bags of them.  It doesn’t hurt to save them for when I’m healthy, but boy do I want strawberries!

I think all the planets aligned because I was also given a bag of rhubarb from my parents’ garden.  And I just bought a new blender.  My mom, The Cook, put two and two together and saved the day.  She threw the bag of strawberries in a big pot with the rhubarb, a little water to get it going, and some honey, then let it boil.  After only 10-15 minutes on the stove and some mashing with a potato masher, it turned nice and thick.

I blended half of it and poured it in an ice cube tray to freeze.  Now, whenever I want a strawberry rhubarb smoothie, I just have to pop a few cubes in the blender, add a banana, some plain yogurt, and maybe a little more honey, and voila!  Springtime smoothie!  **You can also get a secret helping of protein in by adding some nut or seed butter.**

Before getting Ninja'd.

About to get Ninja’d.

Smooth as a baby's bottom.

Smooth as a baby’s bottom.

I might use the other half on pancakes, or better yet, in a pie.  But right now, I don’t have much energy, so an easy smoothie is perfect.  The strawberries are thoroughly cooked and bacteria-free.  Time to add a bit of edible sunshine to my day!

Two fruit cubes, two ice cubes, 1/2 banana, spoonful of yogurt, and a generous squeeze of the honey bear!

Two fruit cubes, two ice cubes, 1/2 banana, spoonful of yogurt, and a generous squeeze of the honey bear!